Tutorial : Setting up the skin of the character and enveloppes
In this post i will explain how to go through the configuration of the enveloppe / skin that will allow the bones to have an influence over the mesh / model of the character / body.
Previously we positionned, rotated, and scaled every bones in place. Then, select the mesh that will receive the influence of the bones :

Then go through the modifiers list and select the "skin" modifier and apply it to the model :
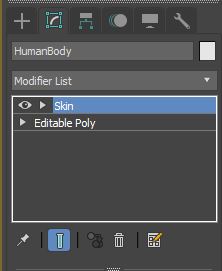
We will be pushing on "Add" bones down there :

Then we select the biped, it should automatically select all the bones under the hierarchy but open some of them to make sure of that :

It will also include "nubs" helper at the end of the fingers and some parts, as we don't need to define ik chains we will get rid of that in the enveloppe section afterwards just press okay.
In the enveloppes menu, just remove every single "nub" associated with the skelettong from being part of the influence on the mesh, that's it.
By selecting "enveloppes" under the skin modifier section, we can now select bones and see what kind of influence they have on the mesh, blue is little to no influence, from red, full weight and influence on the mesh / vertices :
We now have handles of configuration of the influence, both radius and placement of the position of these influences, we are going to reduce that so it doesn't influence the shoulder and the head, we have to configure every single influence, again, it will be a tedious and boring job but we need to do this right if we want the characters to look right too when we animate it :
The head definitely has too much influence there, it should only weight on the head and a little bit on the neck.
I would personnally get the back influence on the head higher, and the front a little bit lower to influence the chin too, approximatively like this (and reduce the radius ) :
Just like the bones and biped, we can copy paste the influence / weight configuration from one bone, to the opposite, just copy the influence and then, select the opposite bone, and press paste.
Because, symmetry.
Part of the spine are influencing the inner arm, not good :
Let's change that :
Same thing for every other spine, just fiddle with radius and position :
The forearm is influencing way too much the upper arm here :
To solve this problem, we are going to check the "select vertices" box in the enveloppe menu :
And select the vertices that should be excluded from the forearm influence's solution, problem solving , one at a time : (you can select multiple vertexes at once of course )
Excluding them from the solution by pressing the "exclude vertices" button : (or you could configure their influence weight to 0 it's the same )
And it should look like this afterwards
Hey gotta watch out for the other side too, it takes some vertices from the biceps there and it ain't right either :
Select :
and remove the weight of these vertices :
Now the hands (and it's a whoooole lot harder than the rest, believe me lol )
Influence is obviously too much for the wrist, and goes way past on the fingers, let's reduce this :
In contrast, the influence of the first bone of the thumb is way too small, and need to be set up:
More like this :
Okay now, each and every individual finger bones have influence over their neighboor which is a problem too :
So we are going to select every vertices of the fingers that are close to them to exclude them...
Just like this :
The problem being you have to repeat this for every single phalange and section of the same finger :D Passionately boring haha ^^
And again...
And again :3
And... heh..
Again ! The worst fingers to configure, are the one in between two freaking fingers ! Lots of vertices to check and to select and exclude, haha , good luck panning and rotating the camera all around selecting every single vertexes that shouldn't be included :D
You need some patience, but if you like job well done, you'll get it right.
And here we go after removing their influence :
Yes... yeah lol... this other finger also has two pesky neighboor that wants their vertices removed from their friend :
After a long, long while doing this for every parts and bones of the model, we can now test some of the movements and have a first look of what is "wrongly" set up by just, GETTING OUT of the figure MODE first, so you don't change the initial configuration, it's important to make sure you UNCHECKED the figure mode before moving the bones.
Let's just lift the arms to see how it behaves with the shoulder, they usually are the worst thing to configure and look at how funny they arch :
Just keep the model in this pose and configure the enveloppes of the torso / shoulder / calves until it looks much more like this :
Now, we put hands forwards, and open them a little to see if the fingers are well configured too :
And close the hands in fists to have a good look, if nothing look too stretched or pinched, but it looks like we did a good job :
Just repeat this for legs, the head, feet and so on and configure each influence so the character looks right, and nothing like this (as an exemple of how it can go wrong if you set influence badly : )
That's about all !
This is such a good post Alex. It's when you realize it is much easier playing a game than making it. I believe this is going to help a lot of people who want to give a try at this.
You have a minor misspelling in the following sentence:
It should be definitely instead of definately.Thank you.